
1986 MX72 Cressida Wagon Build: "Joby"
Page 1 of 6 • 1, 2, 3, 4, 5, 6 ![]()
![]()
 1986 MX72 Cressida Wagon Build: "Joby"
![]() by MR2_FTW Fri Jun 21, 2013 1:04 am
by MR2_FTW Fri Jun 21, 2013 1:04 am
Picked up this poor thing from a guy up in NoVA on 6/9 for $600. It has 158k miles, leaks pretty much every fluid, needs a battery, supposedly overheats (it never did for me), the paint is TERRIBLE, the left rear door doesn't open from the outside, the front right window won't roll down from the switch on the driver's door (never tried the pass. side switch), but the interior is in almost PERFECT shape, and it runs. And it's (more or less) a Celica-Supra wagon!


Here's the service history I have for it.
6/23/98 - 106k
Rear brake shoes & wheel cylinders
6/30/98 - 106k
Battery
7/9/98 - 106k
Emissions fail
7/15/98 - 106k
Air filter, spark plug
8/26/98 - 107k
Front struts, alignment, rotation
9/22/98 - 109k
Transmission service, antenna mast, wheel balance, front wheel bearings
4/27/99 - 115k
Water pump
6/18/99 - 117k
Radiator fan
10/19/99 - 121k
New (used) distributor + spark plugs
1/3/00 - 124k
Plug wires
3/17/00 - 125k
R&R tail shaft housing/diff
3/21/00 - 126k
"Differential assembly/rear susp" + gear oil??
8/24/00 - 130k
Left rear wheel bearing
8/25/00
Catalytic converter
3/22/01 - 137k
Rear muffler
7/18/01
Oil change
10/1/01 - 141k
Neutral safety switch
Right now my plan for this car is to remove the engine and transmission and re-seal everything out of the car. This will make it WAY easier I think. I would LOVE to do a manual swap but parts will be hard to find locally and cheaply. It needs a W58 transmission/shifter/slave cylinder from a MA70 Supra, a W58 from any other car has the shifter in the wrong position. I would then need an MA70 flywheel and clutch kit, as well as an AE86 Corolla clutch pedal, MA60 Celica-Supra master cylinder, and I would have to custom make a hard line, and add in a stainless soft line. Then, the drive shaft needs to be re-sized to fit (I don't remember longer or shorter). Then the big issue is getting the speedometer to work. Still not clear on how that happens.


6/11/13
In talks with a SupraMania member in Fredericksburg about picking up a Supra W58 with around 130k for $200 if it has the slave cylinder, $175 if not.
6/12/13
OK so I plan to pull the engine and replace pretty much every gasket and seal in the motor, I have a couple options.
1) Super cheap no-name brand rock auto kit - $100
2) medium priced rock auto kit made by the same parent company as FelPro - $150
2.5) the above kit + oem head gasket for quality where it really counts - $230
3) the LAST later-generation 5M-GE OEM complete engine overhaul gasket kit in the country from Toyota - $318
EDIT: Holy hell, shipping for that kit on rockauto is like $20, bringing the total to $167. I googled the SealedPower part number and Summit Racing has the same kit for $110 with free shipping. I think I'll do that.
6/14/13
Picked up the row-your-own gearbox today. $250 got me a W58 5-speed manual trans from a 1986.5 Supra complete with shifter/boots and reverse light switch, two used clutch/pressure plate pairs, a flywheel, a brown shift boot to match my interior, and a stock Supra shift knob. And I discovered that the Cressida's driveshaft will in fact spline up into the W58. WIN.
6/16/13
So the left rear door wouldn't open from the outside. I got bored and took 15 min to remove the door panel and have a peek inside. This is what I found

Turns out this little plastic clippy thing had broken and couldn't hold the rod in the handle anymore.

So I took it off, put a zip-tie on the end of the rod, and now the door opens from the outside. Aww yiss.

I also discovered that both of my keys I have for this car are valet keys, so they don't open the passenger door or the hatch. Gonna have to get the code off the door lock cylinder to get a new master made.
6/17/13
Took the lock over to McGeorge and got a new key made. Holy balls my keys were worn as hell check this out. It was even starting to crack. One or two more unlock attempts and it would be snapped, stuck in the lock. The key opens both front doors, but the hatch lock won't turn. I'll have to remove the cylinder and grease it up or something, later.

6/18/13
I got the input shaft seal and bearing cover gasket put in on the W58. The output shaft seal was quite a bit more difficult. The one IN the transmission was a little different design than the part I got from Toyota, I guess it was updated over time. The one in the transmission was a metal outer shell (maybe brass?) with a rubber inner seal. The new one was all rubber. I had to pretty much destroy the old one getting it out with my slide hammer.


6/19/13
I got 99% of the intake side stuff disconnected. Two fuel lines left on that side, plus the starter cable, then off to the exhaust side, then the radiator, and then it should be about ready to go.
6/20/13
Fe came up with the name of the car today. The car's name is Joby, after this magnificent video.
The plate shall be "AWW JOBY"
Anyways, I got everything else disconnected and the engine is basically 4 bolts away from being ready to come out. Since I don't have a hoist, I decided to clean up some of the more visible bits of the engine. This thing is probably the dirtiest engine I've ever seen.


So I took a tupperware container and threw in some water and simple green and some friends and I scrubbed the two intake manifold bits, valve covers, throttle brackets, and fuel rail until they were thoroughly degreased.


So then later this evening I got all the paint off the valve covers and prepped them for paint. Here's how they turned out:


And here's how the engine sits right now.


MR2_FTW- Posts : 188
Join date : 2013-06-07
Location : Virginia -

![]()
![]()
Re: 1986 MX72 Cressida Wagon Build: "Joby"
![]() by Push Fri Jun 21, 2013 10:42 am
by Push Fri Jun 21, 2013 10:42 am

Push- Posts : 125
Join date : 2013-02-26
Age : 37
Location : Naperville, IL -
![]()
![]()
Re: 1986 MX72 Cressida Wagon Build: "Joby"
![]() by MR2_FTW Wed Jun 26, 2013 3:45 pm
by MR2_FTW Wed Jun 26, 2013 3:45 pm


Picked up 5 P-type wheels, four need elbow grease, all need tires.

MR2_FTW- Posts : 188
Join date : 2013-06-07
Location : Virginia -
![]()
![]()
Re: 1986 MX72 Cressida Wagon Build: "Joby"
![]() by OkieRA29 Tue Jul 02, 2013 11:43 am
by OkieRA29 Tue Jul 02, 2013 11:43 am
OkieRA29- Posts : 66
Join date : 2013-07-01
![]()
![]()
Re: 1986 MX72 Cressida Wagon Build: "Joby"
![]() by MR2_FTW Tue Jul 02, 2013 6:51 pm
by MR2_FTW Tue Jul 02, 2013 6:51 pm

Also, I'm going to pull all the lifters and make sure they're all good and clean them out using this process:
Suprabee wrote:Howdy, during my recent project having a full valve job done, I serviced my lash adjusters. Here's my pictorial of the process for those of you new to our lash adjusters.
After removing them from the head, which can be difficult sometimes. Generally they can be pulled by hand using some twisting action to free them from the head. If you have to use a hand tool to grab them wrap with cloth to keep from damaging the adjuster head.
Summary Process: The adjuster piston is freed up and allowed to move at its normal operating distance by loosening and removing years of old oil sludge by repeated steps of flushing with cleaner and compressing in a vice.
You should be able to compress the adjuster by hand by the amount shown below. Note: photo is of a cleaned adjuster. All of my adjusters were froze and would not initially compress by hand. Also, my adjuster have 140k miles on them and have seen very regular oil changes, so odds are most, if not all, of your adjuster will also be stuck and not compress properly.
Step 1) I used brake cleaner, but carb cleaner will work fine too. Hold the adjuster away from you and spray into the side hole as shown below for a second or two allowing cleaner into the cylinder and make it ready for the next step.
here's what came out:
Step 2) compress adjuster using vice. Note: on this first compression step, it may be very difficult to compress the sucker, but don't worry, you won't crush it. Compression I found on this first step was usually only a couple millimeters.
Step 3) Spray again with cleaner as in Step 1
Step 4) Compress again in vice. It should be easier to compress at this point, and basically you keep repeating the flushing and compressing until no more black shit comes out and you can compress the adjuster its full distance. My adjuster took 4 steps to complete the cleaning/freeing up process:
Another pic showing the range of adjuster movement:
If you have trouble pinching then adjuster with your fingers try it this way. When fully cleaned and freed up, the adjuster should "bottom out" with not much force
Step 5) Ready to bleed the adjuster. Use a light viscosity oil. I used 5w-30. Submerse adjuster completely in oil. Cut a piece of a clothes hanger, or small Allen wrench, or something similar to fit into the hole. Compress the ball and spring in the bottom of the adjuster. Feel around for the ball and press down and up repeatedly to allow oil into the chamber below the metal ball/spring. Air will bubble out of the top. Do this until no more air comes out.
Also, found here:
http://www.cygnusx1.net/Supra/Library/TSRM/MK2/manual.aspx?S=EM&P=32
Lash adjuster is ready to be installed back in head in the same location it was removed from...And I always match up the hole on the side of the adjuster(that you sprayed cleaner into) with the oil feed hole on the side wall of the head. Not sure if this matters that much, but I do it anyway.
Rick


MR2_FTW- Posts : 188
Join date : 2013-06-07
Location : Virginia -
![]()
![]()
Re: 1986 MX72 Cressida Wagon Build: "Joby"
![]() by MR2_FTW Tue Jul 02, 2013 6:52 pm
by MR2_FTW Tue Jul 02, 2013 6:52 pm


MR2_FTW- Posts : 188
Join date : 2013-06-07
Location : Virginia -
![]()
![]()
Re: 1986 MX72 Cressida Wagon Build: "Joby"
![]() by MR2_FTW Tue Jul 02, 2013 6:53 pm
by MR2_FTW Tue Jul 02, 2013 6:53 pm
MR2_FTW- Posts : 188
Join date : 2013-06-07
Location : Virginia -
![]()
![]()
Re: 1986 MX72 Cressida Wagon Build: "Joby"
![]() by OkieRA29 Tue Jul 02, 2013 7:11 pm
by OkieRA29 Tue Jul 02, 2013 7:11 pm
OkieRA29- Posts : 66
Join date : 2013-07-01
![]()
![]()
Re: 1986 MX72 Cressida Wagon Build: "Joby"
![]() by MR2_FTW Tue Jul 02, 2013 7:16 pm
by MR2_FTW Tue Jul 02, 2013 7:16 pm
MR2_FTW- Posts : 188
Join date : 2013-06-07
Location : Virginia -
![]()
![]()
Re: 1986 MX72 Cressida Wagon Build: "Joby"
![]() by MR2_FTW Wed Jul 03, 2013 2:37 pm
by MR2_FTW Wed Jul 03, 2013 2:37 pm
MR2_FTW- Posts : 188
Join date : 2013-06-07
Location : Virginia -
![]()
![]()
Re: 1986 MX72 Cressida Wagon Build: "Joby"
![]() by OkieRA29 Wed Jul 03, 2013 3:16 pm
by OkieRA29 Wed Jul 03, 2013 3:16 pm

At least you didn't need a leaf blower for yours.
Also scoring some of those hydraulic lifters from Rock Auto myself this week. Thanks for the heads up!
OkieRA29- Posts : 66
Join date : 2013-07-01
![]()
![]()
Re: 1986 MX72 Cressida Wagon Build: "Joby"
![]() by MR2_FTW Wed Jul 03, 2013 3:24 pm
by MR2_FTW Wed Jul 03, 2013 3:24 pm
MR2_FTW- Posts : 188
Join date : 2013-06-07
Location : Virginia -
![]()
![]()
Re: 1986 MX72 Cressida Wagon Build: "Joby"
![]() by OkieRA29 Wed Jul 03, 2013 3:38 pm
by OkieRA29 Wed Jul 03, 2013 3:38 pm
OkieRA29- Posts : 66
Join date : 2013-07-01
![]()
![]()
Re: 1986 MX72 Cressida Wagon Build: "Joby"
![]() by MR2_FTW Wed Jul 03, 2013 4:07 pm
by MR2_FTW Wed Jul 03, 2013 4:07 pm
Sealed-Power makes a full gasket kit for the 5M as well. Look it up on Rock Auto, then copy-paste the part number into SummitRacing and it's $110 shipped!OkieRA29 wrote:Well, that is what I get for letting it sit for soooo long. Should have been driving this thing years ago. Gotta grab some cam tower gaskets with the lifters as well.
MR2_FTW- Posts : 188
Join date : 2013-06-07
Location : Virginia -
![]()
![]()
OkieRA29- Posts : 66
Join date : 2013-07-01
![]()
![]()
Re: 1986 MX72 Cressida Wagon Build: "Joby"
![]() by MR2_FTW Tue Jul 09, 2013 5:36 pm
by MR2_FTW Tue Jul 09, 2013 5:36 pm
87 Supra Aisin clutch slave cylinder
87 Supra Dorman clutch alignment tool
87 Supra Clutch release bearing
87 Supra Clutch pilot bearing
84 CelicaSupra Beck/Arnley clutch master cylinder
Ordered the following from DriftMotion:
full length clutch hose
W58 pressure plate bolts
ARP 7M flywheel bolts
ARP 7M head studs
12x1.5mm tap
Today, I wire-wheeled, painted, and installed the AE86 clutch pedal, as well as degreased the engine block and W58.

Yesterday I got the oil pan and front block plate on, as well as the timing belt drive gear, oil pump gear, timing belt idler pulley, front main seal, and oil pump shaft seal. Here's how the engine sits now

MR2_FTW- Posts : 188
Join date : 2013-06-07
Location : Virginia -
![]()
![]()
Re: 1986 MX72 Cressida Wagon Build: "Joby"
![]() by OkieRA29 Wed Jul 10, 2013 11:04 am
by OkieRA29 Wed Jul 10, 2013 11:04 am
OkieRA29- Posts : 66
Join date : 2013-07-01
![]()
![]()
Re: 1986 MX72 Cressida Wagon Build: "Joby"
![]() by MR2_FTW Wed Jul 10, 2013 10:58 pm
by MR2_FTW Wed Jul 10, 2013 10:58 pm
Also took the driveshaft over to the NAPA machine shop to see if they could elongate it. They said because of the way some Toyota and Nissan driveshafts are made, the U-Joints are not serviceable/replaceable so they can't do anything with it. They instead referred me to Standard Parts down near the Maury St exit off 95. I took it over there and they said they can't modify the one I have, but they can make me a brand new one with serviceable joints to my specs, but it would likely cost around $350-$400. This may be my only option.
MR2_FTW- Posts : 188
Join date : 2013-06-07
Location : Virginia -
![]()
![]()
Re: 1986 MX72 Cressida Wagon Build: "Joby"
![]() by RayRay Thu Jul 11, 2013 2:29 am
by RayRay Thu Jul 11, 2013 2:29 am
On a side note, do the wagons come with a 1 piece or 2 piece driveshaft??
RayRay- Posts : 114
Join date : 2013-04-29
![]()
![]()
Re: 1986 MX72 Cressida Wagon Build: "Joby"
![]() by MR2_FTW Thu Jul 11, 2013 12:37 pm
by MR2_FTW Thu Jul 11, 2013 12:37 pm
MR2_FTW- Posts : 188
Join date : 2013-06-07
Location : Virginia -
![]()
![]()
Re: 1986 MX72 Cressida Wagon Build: "Joby"
![]() by RayRay Thu Jul 11, 2013 3:09 pm
by RayRay Thu Jul 11, 2013 3:09 pm
RayRay- Posts : 114
Join date : 2013-04-29
![]()
![]()
Re: 1986 MX72 Cressida Wagon Build: "Joby"
![]() by MR2_FTW Thu Jul 18, 2013 5:51 pm
by MR2_FTW Thu Jul 18, 2013 5:51 pm
Mother of sweet little baby Jesus I need this in my life....but so much moneyyyyyy
$450
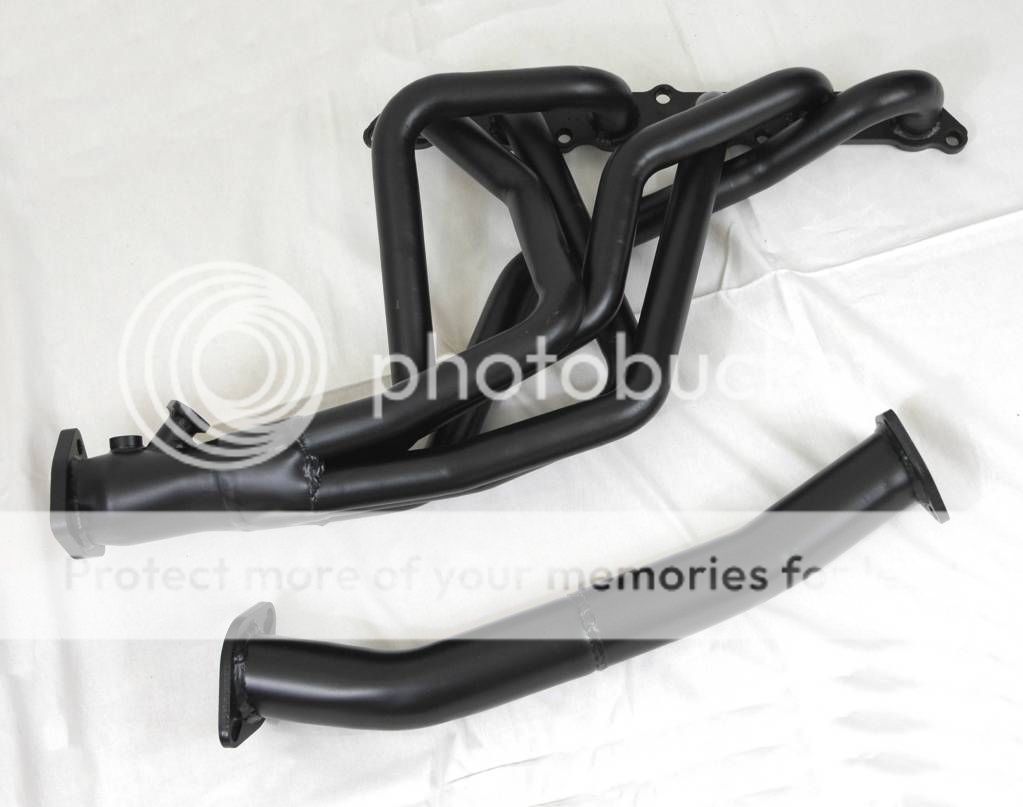
$200
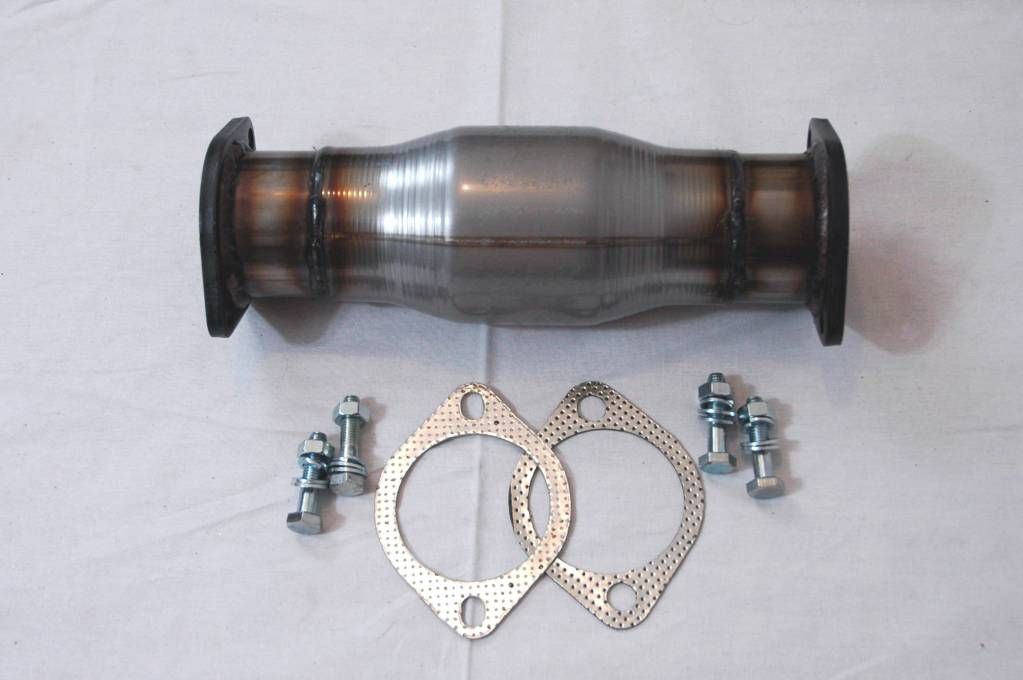
$290
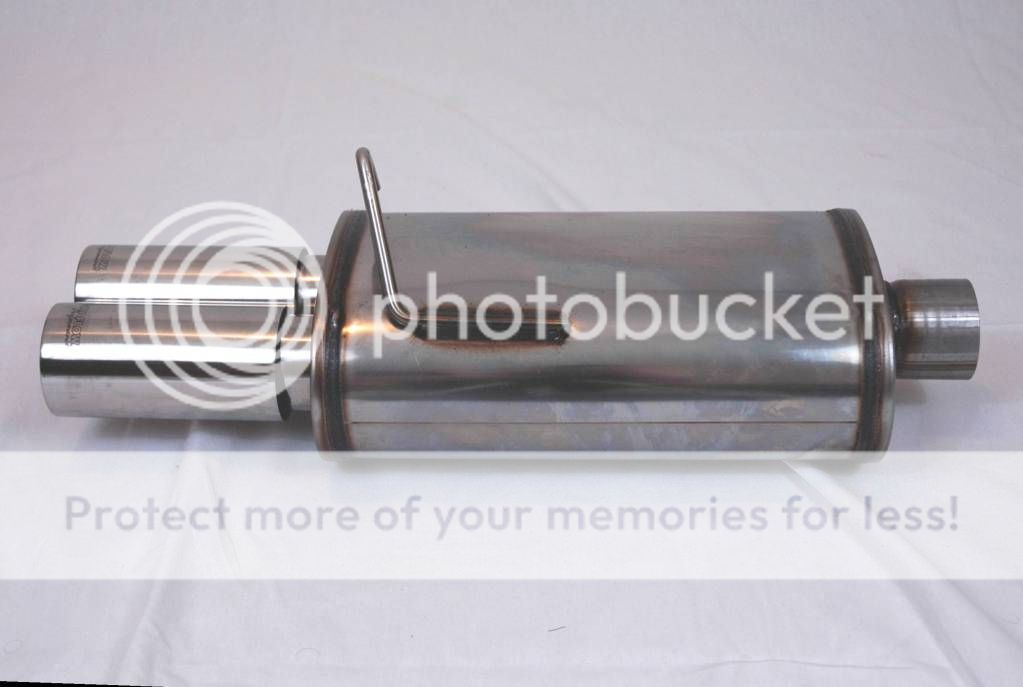
Plus the custom work it would take to connect all those things together. But holy crap that sound!!!!
7/18/13
Got the driveshaft back. It's purdey. I got it made at Standard Parts over at 500 Commerce Rd, Richmond, VA (804) 233-8321
The front U-joint is a beefy replaceable "american type", the rear U-joint is a less-beefy-but-still-better-than-stock replaceable "newer Toyota type". The old shaft is 54.5" long, the new one is 58" long since the W58 manual trans is 3.5" shorter than the stock auto.

My package from DriftMotion came in today as well. Contents:
ARP 7M-GTE head studs (5/6/7M can all use them)
DM braided steel full-length clutch hydro line
New pressure plate bolts
ARP 5M/7M flywheel bolts
Tap for chasing the cylinder head bolt threads in the block

I should be picking up the head and the flywheel from the NAPA machine shop tomorrow
MR2_FTW- Posts : 188
Join date : 2013-06-07
Location : Virginia -
![]()
![]()
Re: 1986 MX72 Cressida Wagon Build: "Joby"
![]() by MR2_FTW Thu Jul 18, 2013 10:18 pm
by MR2_FTW Thu Jul 18, 2013 10:18 pm

OK so the plug pinouts in the BGB are for the plugs on the transmission (which is gone now). I have copied them and flipped them (the bottom ones) to represent the plugs in the harness that the trans plugs went into.
So essentially my understanding is that to start the car the computer has to think it is in either Neutral (N) or Park (P). In order to make the comp think it is in N or P, pins "B" and "N" in the left-hand plug (Plug 1) must be connected. Simply shorting that connection with a bit of wire should allow you to start and drive the car.
However, now the computer permanently thinks it's in P or N all the time, disabling cruise control. I was thinking that if you ran those connections to the clutch pedal switch so that you have to push the clutch to start the car, and that also allows for cruise control to disable when the clutch is pressed.
Alternatively, you would wire it to a switch in the cabin, you can then toggle that P/N connection on and off. Have one switch position labeled "Start" and one "Cruise". "Start" position would be a complete circuit, tricking the car into thinking it's in P or N, allowing you to start the car. "Cruise" position would be an open circuit, making the computer think it's in D, and allowing the cruise control to work.
Next issue is reverse lights
The plug coming out of the W58 has two wires in it, and I'm GUESSING that the way it works is when you put the trans in reverse, it completes a circuit. So basically all you'd have to do is connect pin C on plug 2 to one pin in the trans plug, and pin R in plug 1 to the other pin in the trans plug.
This is all just me looking at diagrams. I have no idea if this actually works.
MR2_FTW- Posts : 188
Join date : 2013-06-07
Location : Virginia -
![]()
![]()
Re: 1986 MX72 Cressida Wagon Build: "Joby"
![]() by Push Fri Jul 19, 2013 1:15 pm
by Push Fri Jul 19, 2013 1:15 pm
Push- Posts : 125
Join date : 2013-02-26
Age : 37
Location : Naperville, IL -
![]()
![]()
Re: 1986 MX72 Cressida Wagon Build: "Joby"
![]() by MR2_FTW Sat Jul 20, 2013 11:12 am
by MR2_FTW Sat Jul 20, 2013 11:12 am

I chased the threads in the block with the tap from DriftMotion and put the ARP studs in

And the head is on!

The only weird thing about using 7M studs on a 5M is that the 7M studs are a hair too short, so basically you thread them into the block as far as they will go tighten them hand tight, put the head on, install the washers and nuts finger tight, then "loosen" the studs so they have more threads in the nuts. I made it so there is one unused thread in the nuts, I feel as though this is adequate threading for both the nuts and the block. Then torque it down in sequence in three equal steps up to 90 ft-lbs. My torque wrench only goes up to 75 unfortunately, so I just did up to 75 plus 30* or so.
MR2_FTW- Posts : 188
Join date : 2013-06-07
Location : Virginia -
![]()
![]()
Page 1 of 6 • 1, 2, 3, 4, 5, 6 ![]()
![]()
» 1986 Toyota Cressida Wagon MX72 FOR SALE
» FS: 1986 Cressida Wagon 5 speed LSD
» Rear Tail Light Assembly Passenger Side MX72 Cressida Wagon HELP!!!!!!!!!!!!
» custom 1-pice driveshaft for W58 MX72 wagon. Pittsboro, NC. pick up only.
|
|
|